CAUTION: Improper connection of the gas supply can cause fire and/or explosions. The gas supply should be installed, adjusted, and tested by a qualified gas installer.
This procedure can be applied to the following models: Giesen W1A/W6A/W15A/WPG
Required tools for the gas valve adjustment:
- digital manometer to measure gas pressure in mbar
- 8 mm wrench
- 5 mm wrench
- flat screwdriver
Before the adjustment
- watch the short tutorial with the technician
- read carefully this article
- check the gas type and inlet as pressure requirements on the machine's sticker
- make sure you have all the required settings for 1%, 2%, 99% and 100% power level
- If you didn't understand the procedure, please contact Giesen Service Department at service@giesen.com or our service partners in your region Giesen - Partners
Natural gas - G20 mBar(+- 0,1)
| Model/Power level | 0% | 1% | 99% | 100% |
| WPG | 0.8 | 1.1 | 9.7 | 10 |
| W1A | 0.8 | 1.1 | 7.2 | 7.5 |
| W6A | 1 | 1.3 | 9.2 | 9.5 |
| W15A | 1.8 | 2.1 | 9.7 | 10 |
Propane gas - G31 mBar(+- 0,1mBar)
| Model/Power level | 0% | 1% | 99% | 100% |
| WPG | 0.8 | 1.2 | 13.4 | 13.8 |
| W1A | 0.8 | 1.2 | 13.6 | 14 |
| W6A | 1 | 1.4 | 17 | 17.4 |
| W15A | 1.8 | 2.2 | 28.6 | 29 |
European gas - G25 mBar(+- 0,1mBar)
| Model/Power level | 0% | 1% | 99% | 100% |
| WPG | 0.8 | 1.1 | 9.7 | 10 |
| W1A | 0.8 | 1.1 | 7.7 | 8 |
| W6A | 1 | 1.3 | 11.2 | 11.5 |
| W15A | 1.8 | 2.1 | 11.2 | 11.5 |
Before the adjustment:
Verify that the current inlet pressure on the gas valve meets requirements. Make sure the digital manometer is turned On and set to “0”, now you can connect the hose at the inlet.
To do that, slightly unscrew the bolt in the bottom meassuremet point (turn three times to open it, do not remove it) and attach the hose of the digital manometer to it. Tight the bolt back(do not aplly force on it) once you have completed the measurement.
Recommended inlet gas pressure in mBar(+- 0,2 mBar)
| Model/ Gas type | G20/Natural gas, mBar | G25/European gas, mBar | Propane, mBar |
| WPG | 20 | 25 | 30 |
| W1A | 20 | 25 | 30 |
| W6A | 20 | 25 | 37 |
| W15A | 20 | 25 | 50 |
Adjusting the gas valve:
Recomendations: Best is to do this when you start from a cold machine.Take the tryer out and put that between the bean release door so that the machine takes longer to heat up.
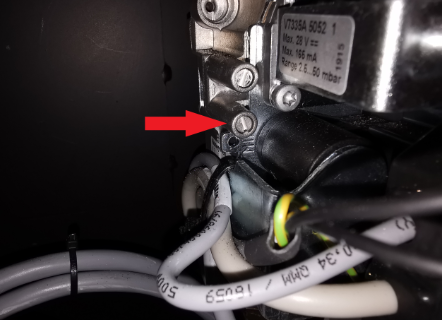
- Go to the back of the roaster and locate the top screw of the gas valve (marked with the yellow arrow) turn it three times to open it(do not remove it). Make sure the pressure gauge is turned on and set to “0”, now you can connect the hose to the top measurement point.
- To access the maintenace burner mode on the control unit, press F2 2 times until a login screen appears
- Type in 7071 by using the on-screen keyboard, for the machines builded after 2024 you need to use 70912006
- Press F2 once more to enter the adjustment page
- Write down the factory A/B values in your notes
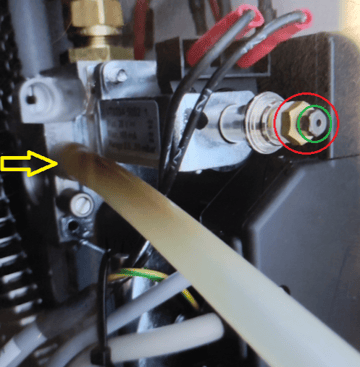
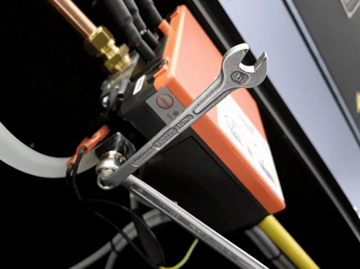
- To adjust it proceed to remove the plastic cap to access the nuts. You will need an 8 mm wrench and a 5.5 mm wrench. With the 8 mm wrench, hold the copper nut marked with the red circle while using the 5.5 mm wrench to gently adjust the nut marked with green. Put both wrenches on the valve to achieve more precise control during adjustment. Hold one wrench steady while you are turning another one.
- Now start the machine as usual, and start the burner.
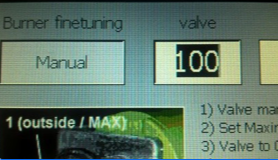
-
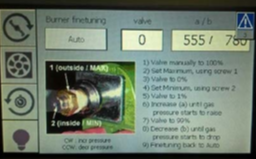
Return to the maintenance mode. In the field "valve" type in 100 (as in 100%) then tap the button that says "auto" which will change it to manual mode.
- Use 8mm vrench to adjust the high load. You need to set the value for 100% according the type of gas and model from the tables above
- Then put 0 to adjust the low load and use smaller wrench to set the value for 0% according the type of gas and model from the tables above. To raise the low load , turn the nut clockwise.
- Repeat the same sequence again for 100% and 0% to verify the values
- Now you need to adjust the 1% and 99% setting in the software. This is for
modulation use, and is very important to do as well. So far we've only adjusted the
minimum and maximum of the valve, the software modulates the flame according
to temperature and personal setting - Leave the control burner in manual mode, and set it to "1". Have a look at the mBar meter. Adjust the value in the "A" field until the value on the mBar meter is
met the valuese for 1% from the table in mBar(+- 0,1mBar) - Be sure to go to 100% and back to 1% after every change of the field "A". This fully
opens the valve and closes it back to 1%. this ensures a good setting - Do the same for 99%. Have a look at the mBar meter. Adjust the value in the "B" field until the value on the mBar meter is
met the valuese for 99% from the table in mBar(+- 0,1mBar). Make sure the setting is around 0.30 lower than 100% (e.g. 28.7 mbar for a W15) after every change of the field
go to 0% and back to 99% in order to fully close and re-open the valve, this
ensures a good setting - Keep on changing the values untill you have reached the correct settings
- Important: Once all of this is done, set the valve back to "0" and tap "Manual" to go back to
automatic mode. Now you are able to use the roaster on a different type of gas
NOTE: adjustment may required specialy if your location is higher than 500 m above the sea level