
Record your first roast, save the data and find the result. You operate the roaster yourself; Profiler records the progress. Start this guide with a connected roaster and no profile loaded.
These steps and screen names are based on Profiler 2.3.3. Settings, readings and available features may vary by machine and installation.
The screenshots use example data. Use your own machine settings and measured batch weights.
Before you start
Are you signed in, and do you see current readings that match your machine? You are ready to begin. If Profiler still needs setting up or readings are missing, follow Install and connect Giesen Profiler 2 first.
Set up Profiler before roasting. Operate, charge, discharge and cool the roaster according to its machine manual. Stop in Profiler is not an emergency stop for the machine.
1 Prepare the recording
Weigh the green beans and note the coffee or lot and the start weight. Prepare the roaster according to your roasting procedure.
Start without a loaded profile. If a profile name and a Play button appear below the chart, click the cross next to the profile name outside an active recording. The saved profile is retained; you are only removing it from the dashboard. The start button now shows Record.
Before charging, check these settings for this manual workflow. Open Settings → General and the arrow next to Record. See Settings for your first recording for screenshots and explanations.
| Where | Setting | Position |
|---|---|---|
| General → Roasting | Initialize setpoints on profile load | Off |
| General → Roasting | Reset setpoints on profile finish | Off |
| General → Automation | Charge Detection Auto-Start | Off |
| General → Automation | Enable Discharge Detection | On |
| Arrow next to Record | Enable Start Delay | Off |
| Arrow next to Record, if available | Open Intake on start | Off |
Check: Record is visible, current readings are coming in, the settings above are correct and you have weighed the green beans.
2 Start the recording
- Match the recording to the actual charge: click Record when you load the beans into the roaster according to your machine procedure.
- Check that the timeline is running, a temperature curve appears, and Stop and Abort are visible. Operate the roaster according to your roasting procedure.
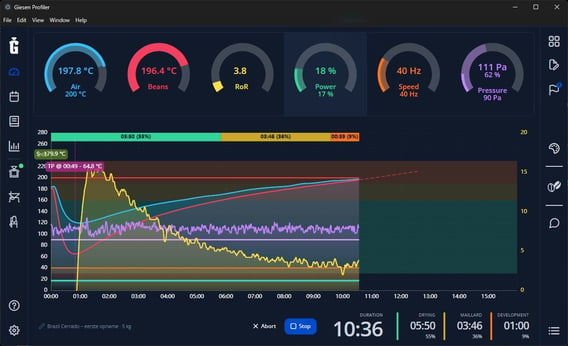
Check: the timer and temperature curve are running; Stop is visible below the chart. Details, Crack and Note are on the right.
3 Enter batch details and mark first crack
- Open Details, the paper-and-pencil icon on the right. Enter a recognisable profile name, Bean Type or Choose lot, and Start Weight. Check kg or lb. You can also enter these details when saving.
- Click Crack, the bean icon, when you hear first crack. A further click marks second crack if you observe it.
- Use Note, the speech bubble, to add a note at the current time if needed. Hover over an icon to see its function name.
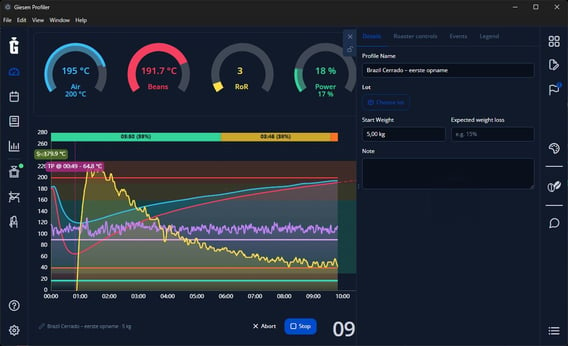
Details: enter the name and measured green start weight. With inventory features, this shows Choose lot; otherwise you may see Bean Type.
Does Crack show Turning point required? Profiler has not yet recorded the turning point. That point is needed before you can mark crack.
Check: the timeline and curves continue. If you have marked first crack, its marker is recorded. Keep monitoring the machine and the coffee.
4 Discharge the beans and finish recording
- Discharge the beans and start cooling according to the machine manual.
- If Discharge Detected appears after you have discharged, choose Stop Now or let the countdown finish. Recording ends and Save Profile opens. Use Continue Roasting only if detection was incorrect and the roast is still in progress.
- Is recording still running without that window? Choose Stop immediately when discharging. After a detected turning point, recording stops directly; before that point is detected, Profiler asks for confirmation.
Check: Save Profile is open and recording has stopped. Do not click Stop again.
5 Weigh and save
Keep Save Profile open while the beans cool. Then weigh the roasted beans and enter these details:
| Field | What to enter |
|---|---|
| Profile Name | A recognisable name, such as ‘Brazil Cerrado – first recording’. |
| Bean Type | Coffee type or lot identification. |
| Start Weight | The green weight measured before charging. |
| End Weight | The actual weight after cooling and weighing. |
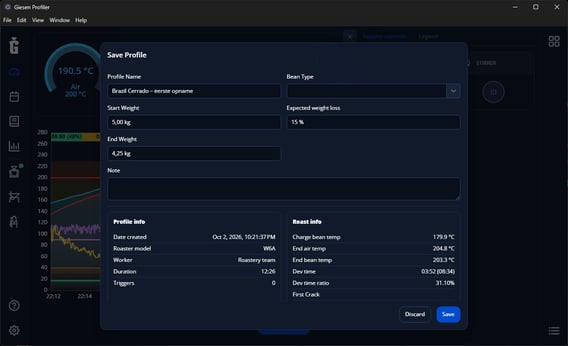
Save Profile: enter your batch details and choose Save at the bottom right. The example uses 5.00 kg green and 4.25 kg after roasting; these are example values, not roasting advice.
Check the weight unit. An end weight calculated from Expected weight loss is an estimate; replace it with your measurement. Choose Save and wait for saving to complete.
Do not use Discard or Abort to save. These actions discard the recording. If ‘Unable to save the recording’ appears, resolve it before starting another roast.
Check: after saving successfully, the profile is loaded on the dashboard. To record the next roast manually, remove it using the cross next to the profile name; Record appears again.
6 Find your result
Open Profiles, search for your profile name and open it to check the temperature curve, batch details and markers. Roasts also contains the record of the roast you performed.
| Item | Meaning |
|---|---|
| Profile | The roast profile you can view, edit or reuse later. |
| Roast | The record of this roast. |
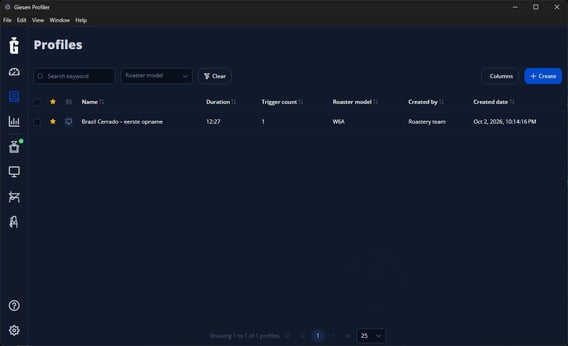
Profiles example with ‘Brazil Cerrado – eerste opname’. Search for your own profile name. The monitor icon in the status column means this example is stored locally only.
Is the recording also in the cloud?
Look at the status column next to the profile name and hover over the icon:
| Status | Meaning |
|---|---|
| Local only, monitor | Saved only on this computer. |
| Synced, green check | Synced with the cloud and available locally. |
| Pending sync, upload icon | Synchronisation has not finished. |
| Sync error or Sync conflict | There is a problem to resolve first. |
| Online — downloads when opened, cloud | Stored in the cloud and downloaded when opened. |
Cloud synchronisation requires internet, cloud storage and a suitable subscription. If Sync is available, you can use it to start synchronisation. Check the status before continuing on another computer.
Your first recording is saved: you can find the profile, open the curve and verify the batch details. Local saving and cloud synchronisation are separate results.
Need help?
| What you see | What to do |
|---|---|
| No current readings | Follow Install and connect Profiler. Do not start recording yet. |
| Play instead of Record | Remove the loaded profile using the cross, outside an active recording. |
| Record is grey | Check the button message and connection, and wait if the previous recording is still being saved. |
| Recording stops at discharge | Continue in Save Profile, as in steps 4 and 5. |
| Profile is missing | Search for the name you entered, check Settings → Account and any saving errors. |
| Profile is missing on another computer | Check the sync status and account/team. |
Still having trouble? Email support@giesen.com with your Profiler version, model, serial number, connection method and exact message. Include a screenshot if possible.