
Use this article to connect a supported W series roaster to Giesen Profiler 2 through Ethernet. When finished, current readings appear on the dashboard. You can then continue with your first recording.
Screen names are English and based on Profiler 2.3.3. Set up the connection outside an active roast.
1 Gather the correct machine details
You need the exact model, serial number, PLC version and roaster IP address. Use the machine details in the installation or service documentation. The serial number and model are usually on the nameplate; if unsure, ask Giesen Support to check them.
PLC version means the version of the controller in the roaster. It is not the Profiler version, such as 2.3.3. Do not choose a PLC version based only on the machine's age or appearance. If you do not know the version or IP address, send the model and serial number to support@giesen.com before configuring the connection.
2 Connect the computer
Connect the computer's Ethernet port to the designated network connection on the roaster or its configured network. If the computer has no Ethernet port, use a suitable Ethernet adapter. Check that the cable is connected and the roaster is switched on according to the machine manual.
On a company network, ask the network administrator whether your computer can reach the roaster and which address settings to use. Do not apply an example address yourself on that network.
3 Configure the Ethernet adapter
An IP address is a device's network address. The computer and roaster must be able to reach each other. For a direct cable connection, configure the computer's Ethernet adapter on the same subnet as the roaster, using its own unused address. A subnet is the local address range in which devices communicate directly.
Record the adapter's existing settings first. Change the adapter connected to the roaster. For a managed computer, ask the network administrator for help if needed.
Example for a direct connection
This example applies only if the confirmed roaster address is 172.30.30.50 and the subnet mask is 255.255.255.0. Also check that the computer address is available.
| Item | Example |
|---|---|
| Roaster | 172.30.30.50 |
| Computer, Ethernet adapter | 172.30.30.230 |
| Subnet mask | 255.255.255.0 |
With this subnet mask, the first three numbers match and the last number differs. Do not give the computer the same address as the roaster. Other machine addresses or subnet masks require different computer settings.
Set up your computer
Follow the instructions for your operating system, then return here at 4 Add the roaster in Profiler.
A direct Ethernet connection to the roaster does not automatically provide internet. A “no internet” message for that adapter does not by itself mean that Profiler cannot connect. Arrange internet separately for sign-in or synchronisation.
4 Add the roaster in Profiler
- Open Settings → Connections and choose Add new. The configuration window may already be open after your first sign-in.
- Enter a recognisable name in Enter your roaster name, such as ‘Production roaster’.
- Enter the actual serial number in Enter your roaster serial number.
- Choose the correct model in Select the roaster model and the confirmed controller version in Select the PLC version.
- Check Address. Profiler may suggest a default address; compare it with the actual roaster address. Click the address to change it if your machine uses a different one.
- Choose Save.
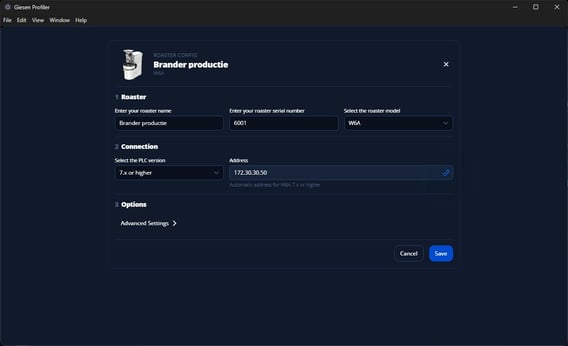
W6A example with controller version 7.x. Serial number 6001 and address 172.30.30.50 are example data only. Choose your roaster's actual model, serial number, confirmed controller version and address.
What you should see: Profiler immediately attempts to connect and opens the dashboard on success. You do not need to enable the new connection again. If the roaster is reported as unreachable, the configuration window stays open: check the address, cable and network, then retry.
5 Check the connection
Compare bean temperature and other available readings in Profiler with the machine. Check °C or °F. Wait for new readings; an old value or a saved connection name alone does not prove that the connection works.
Ready: live readings are arriving and match the machine. Continue with Record your first roast.
If the connection fails
| What you see | What to check |
|---|---|
| No Ethernet connection in Windows or macOS | Cable, adapter, selected port and powered-on roaster. |
| Profiler cannot reach the roaster | Roaster address, available computer address, subnet mask and correct model/PLC combination. |
| Connected, but readings are missing or implausible | Model and PLC version; compare readings with the machine before roasting. |
| Address or controller version unknown | Ask Giesen Support to check the machine details. |
If you use the Ethernet adapter on another network later, restore its original settings or follow your network administrator's instructions.
For help, send your Profiler version, model, serial number, selected PLC version, network setup and exact message to support@giesen.com.
Reference: default roaster addresses
These are factory defaults, not a replacement for confirming your machine’s actual configuration. A modified installation may use different addresses. Do not select an address from build year alone.
W-series PLC 7/9 default addresses
| Model | Roaster IP Address | Subnet Mask |
|---|---|---|
| WPG | 172.30.30.10 | 255.255.255.0 |
| W1 | 172.30.30.30 | 255.255.255.0 |
| W6 / W15 | 172.30.30.50 | 255.255.255.0 |
| W30 | 172.30.30.70 | 255.255.255.0 |
| W45 / W60 | 172.30.30.90 | 255.255.255.0 |
| W140 | 172.30.30.110 | 255.255.255.0 |
Legacy W-series PLC default addresses
| Model | Roaster IP Address | Subnet Mask |
|---|---|---|
| WPG | 192.168.2.180 | 255.255.255.0 |
| W1 | 192.168.2.180 | 255.255.255.0 |
| W6 / W15 | 192.168.2.180 | 255.255.255.0 |
| W30 | 192.168.3.180 | 255.255.255.0 |
| W45 / W60 | 192.168.3.180 | 255.255.255.0 |